Thursday, March 31, 2011

Using Cisco Wireless Lan Controllers for a Wired Guest Network

Most people are familiar with using Cisco's mobility anchors to provide a wireless guest network.  The usual topology is that you have a controller with CAPWAP access points connected to it and then a foreign "anchor" controller that is located in the DMZ.  Between the two controllers traffic is tunneled to logically separate the traffic from the rest of the regular network. In this way guest traffic can be effectively managed while keeping internal resources secure.

The same separation can be achieved for a wired guest LAN by using the same WLC architecture.  Setting it up requires the following:

  • The WLC inside the network must have it's interface setup as a dot1q trunk to handle multiple VLANs
  • UDP Port 16666 or IP Protocol 97 must be able to pass through the firewall between the inside WLC and the anchor WLC.
  • A dedicated L2 VLAN for the guest wired network
  • Mobility Groups are already configured on the WLCs.
  • DHCP configured on the Anchor Controller
Configure the Ports

First go to the switch connected to the local WLC and do the following assuming that the WLC is connected to Gi1/0/1 and the new guest wired vlan is 601


switch#configure t
switch(config)#interface Gi1/0/1
switch(config-if)# switchport trunk allowed vlan add 601
Next go to the switch connected to the access port(s) that you want on the guest wireless and do the following:

switch#configure t
switch(config)#interface range gi2/0/1 - 5
switch(config-if-range)# switchport access vlan 601
 Configure the Local WLC


Login to the local WLC web GUI and go to Controller and then Interfaces and click New.  This will bring you to the following screen where you give the Interface a name and tell it what VLAN it should be on.  


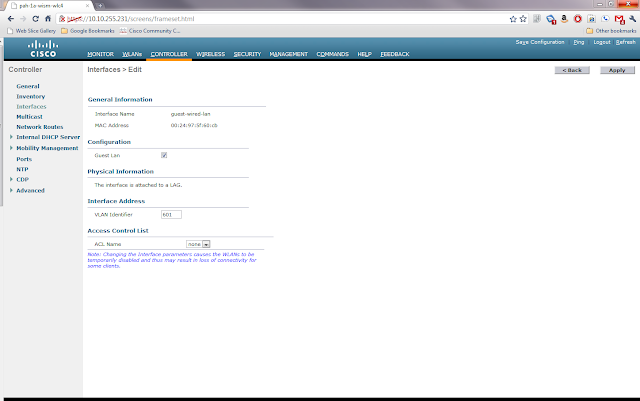
Once the information is entered, click apply.  This will bring you to another settings page for the new interface.  In this screen you need to click the box marked Guest LAN and then click Apply.


Now go to WLAN and then click Go next to where it says Create New.  This will bring you to the following screen where you will choose type Guest LAN and give the profile a name.


Clicking Apply will bring you to the WLANs Edit screen for the new profile.  Here there are a few choices to be made about security.  The default is that users will need to login using web authentication if they want onto this guest network.  This requires that you have either setup local usernames and passwords, perhaps through the lobby ambassador setup, or have guest accounts through AAA.  For this example I will use the Web Passthrough option with makes the user accept an acceptable use policy before gaining access.  On the general tab I clicked enable and chose the guest-wired-lan interface that we created earlier as the Ingress Interface.


Next I clicked on the Security Tab and Layer 3 Tab to change the Layer 3 Security to Web Passthrough.  Note that you also have the ability to require web passthrough users to give you their e-mail address, but it doesn't validate it is a real address.


Once you click Apply you will be back to the WLANs list page.  On the right side of the page there is a blue box with a white down arrow next to the WLAN profile we created.  Hover over it and choose Mobility Anchors.  Once you're in that page you will choose the IP of the foreign anchor controller from the drop down and then click Mobility Anchor Create.


This completes the configuration of the local WLC.


Configure the Anchor Controller


Login to the anchor controller and click on WLANs and then Create a new WLAN profile just like the one on the Local Controller above except that the ingress interface is None and don't click enabled.  Once you click apply, go to the mobility anchors for the new profile and make sure the Switch IP Address is set to (local) and click mobility anchor create.  Once you have done this, you can go back to the profile screen and check enabled.  


Wrap Up


This article is a rather whirlwind how to of setting up a guest wired network using the Cisco Wireless LAN Controllers.  There are many intricacies not discussed here, but there are plenty of good documents on Cisco's website about how to configure the WLCs.  I do have a question for anyone from Cisco or a wireless guru.  If you have multiple WLCs on the local LAN, can you have the same wired guest vlan piped to all of them or do you have to have a different vlan for each controller?  If you can have the same vlan, how does the traffic know which controller to associate with?


Monday, March 28, 2011

P@$$W0rD$

As a young naive network admin I thought I could remember everything about everything.  Writing things down, especially passwords, was a waste of time and a security problem.  Well, as things often do, my view on this has come full circle.

Password management is an important part of network documentation.  Without a plan, you end up with two things happening.  First you end up forgetting that rarely used password for the oddball piece of equipment in the back closet of the back room of the building into which no one ever goes.  Unfortunately the day after you forget totally about it, it acts up and you have to get access to it's command line quickly to fix the problem.  Second you end up with a lot of systems having the exact same username and password combination.  This means that when you have to share the password with a technician that doesn't need access normally you will have to reset the password everywhere.  Oh and you do remember everywhere it needs reset right?  

Both of those scenarios were about keeping yourself in the loop, but password management is also important in the event of a loss of personnel.  I often refer to this as the "What if Ben is hit by a bus tomorrow?" information that someone will need to run things if I die or otherwise am no longer at the company.  I really don't want the company sending Jack Bauer into my ICCU room to coerce the passwords out of me while doped up for pain or something.

My solution to managing passwords, both professionally and personally, is to use an application that creates an encrypted file containing all of the passwords.  There are two such software packages (both opensource) that I have used.  The first is PasswordSafe and the other is KeePass.  I personally have settled on KeePass because the application is available for Linux (using Mono), Windows and iOS (Apple, not Cisco).  I have two files, one for work and one for home.  The iPhone app is synchronized manually using a builtin webserver over the phone's wifi connection.  I use Dropbox to synchronize the files between computers.

Friday, March 25, 2011

Cisco Config Rollback and Replacement

In the previous two posts I have outlined how to create a configuration archive and how to compare configurations.  In this post I will look at how to take an archived configuration and use it to replace the current configuration for rolling back changes.  This article assumes that you already have a configuration archive in place.


Before making any changes to the configuration you need to run the command archive command to force IOS to make a backup copy of the current running-config.  Once this is done, make any changes to the configuration.  At this point you've either got a new running-config that you like and that works or you have created a problem and it's time to rollback through configuration replacement.


If you need to rollback the changes, you will need to do the following:


Router# configure replace scp://scpuser:scppasswd@scpserver/configuration1.cfg revert error  time 5
Router#configure revert now
Router#configure confirm

The configure revert now and configure confirm are both optional commands depending on how you configure the replace command and the outcome.  For example if you are sure that you don't want to revert to the previous running-config typing configure confirm will make the change permanent and resets the timer set in the replace command.  In the above example because we set the time 5 part of the command we must issue configure confirm within 5 minutes or IOS will automatically revert to the previous running config.  If you find that you need to revert  immediately to the previous config you run the configure revert now command. 

As you can see, this can be good for making and rolling back changes as necessary.  Theoretically you can also take a configuration file and edit it offline and then copy it back to the device with the changes.  I say theoretically because you have to be very careful to meet the requirements of the IOS Configuration file in terms of indention.

Monday, March 21, 2011

Cisco Config Diff Tools

In the last post I examined the archive tools provided in IOS to backup device configurations to a FTP, TFTP or SCP server.  Now I would like to look at some of the tools IOS provides to work with these archived configurations.


Diff


Contextual Configuration Diff Utility is the official Cisco name for what Linux people call diff.  Diff in it's most basic form takes two text files and tells you what is different between the two files line by line.  Before we look at IOS let's take a basic example of diff from a Linux box.


Listing of File1.txt
apples
beer
coffee
donuts
eclairs
 Listing of File2.txt
apples
beer
cottage cheese
donuts
fudge

 Example of diff


storyb@nettools:~$ diff file1.txt file2.txt
3c3
< coffee
---
> cottage cheese
5c5
< eclairs
---
> fudge

In this example, you can see that it shows that coffee was in the first file, but cottage cheese was in the second and likewise that on line 5 eclairs was in the first file, but fudge was in the second.


Cisco's Diff


Cisco's diff works very similarly to Linux's.  In the following example of using IOS' diff we will use the following two abbreviated IOS configuration files.


Listing of iosconfig1.cfg


no ip subnet-zero
ip routing
router ospf 1
  network 192.168.1.0 0.0.0.255 area 0
interface Ethernet 0/0
  ip address 192.168.1.1 255.255.255.0
  no ip route-cache
  no ip mroute-cache
interface Ethernet 0/1
  shutdown
Listing of iosconfig2.cfg
ip subnet-zero
ip routing
router ospf 1
  network 192.168.1.0 0.0.0.255 area 0
interface Ethernet 0/0
  shutdown
interface Ethernet 0/1
  ip address 192.168.1.1 255.255.255.0
  no ip route-cache
  no ip mroute-cache
 Example 1: show archive config differences
show archive config differences scp://scpuser@server/iosconfig1.cfg scp://scpuser@server/iosconfig2.cfg

+ip subnet-zero
interface Ethernet 0/0
  +shutdown
+interface Ethernet 0/1
  +ip address 192.168.1.1 255.255.255.0
  +no ip route-cache
  +no ip mroute-cache
interface Ethernet 0/0
  -ip address 192.168.1.1 255.255.255.0
  -no ip route-cache
  -no ip mroute-cache
interface Ethernet 0/1
  -shutdown
There is also a second version of the diff utility for IOS that compares a configuration file with the running configuration and tells you what lines are in the config file that are not in the running configuration.  This command is show archive config incremental-diffs <filename>.  It is useful to compare a previous archive to the running configuration to see what had been deleted from a configuration.


My next post will look at the tools that IOS provides to do configuration replacement and rollback using archived configurations.

Friday, March 18, 2011

Cisco Config Archiving

Not everyone can afford to install and maintain a massive change management database application for their IT infrastructure.  Thankfully at least on Cisco IOS devices it is quite simple to setup a reliable way to archive the devices' configurations.  For those of you that maybe aren't sure why this is important, let me give a few examples of when it could be very useful.


  1. Device Failure:  Imagine that your core switch or router fails hard and you have to put in a replacement.  Think about how long it would take to configure the new device from scratch and how error prone the process would be.  Instead you could just slap the configuration that was archived from the old device on the new device and be back in business in a few minutes (not including the time to get the spare in place physically).
  2. Change:  So what happens when the network goes down or has a problem?  The first question is usually "What changed?".  Your configuration archive along with some tools like diff or the built in IOS archive compare can tell you what has changed on a device.  
  3. Auditing:  Many companies are subject to legislation like Sarbanes-Oxley or HIPAA.  Tools are available to perform audits on IOS configs to ensure compliance.  With an archive you can run these tools against the directory of text files quickly without having to allow the scripts access to the live device.

Ok so now that you know WHY you want configuration archiving, let's look at how to configure it.  The first step is that the device must be running an IOS version that supports the command.  In router IOS it was introduced in 12.3, in switches it has been back ported to 12.2.  

Assuming that the device now supports the archive commands, setting up archiving is fairly straight forward.
router# config t
router(config)# archive
router(config-archive)# path tftp://tftpserver.example.com/$h.cfg
router(config-archive)# write-memory
router(config-archive)# time-period 360
router(config-archive)# end
router# copy run start
The first command is simply archive which puts you into config-archive mode.  Next we set the path to where we want the archived configurations to be stored.  In this case we're putting it onto a TFTP server.  Because I like to have template configurations that I can easily paste into a device I used $h to have the router put the host name automatically into the path statement.  The next statement write-memory tells the device to archive the configuration every time someone does a copy run start or wr mem.  Finally time-period tells the router the amount of time in minutes between archives.  In this case the router would archive the configuration every 6 hours.


As configured above, the router would put a new file into the TFTP server every 6 hours forever or until the TFTP server ran out of space.  Thankfully for some URL types like SCP and FTP, IOS will manage the number of archived configurations for you.  With those types of URLs you can specify maximum <number> in the config-archive mode to tell IOS how many backup copies to keep.  When it hits the maximum it will overwrite the oldest file the next time it archives the configuration.


In my next post I will look at the tools within IOS for using archived configurations to find differences and to rollback to old configurations.

Thursday, March 17, 2011

PKI Uncovered Book Review

I have recently had the chance to read the new Cisco Press book PKI Uncovered: Certificate-Based Security Solutions for Next-Generation Networks  by Andrew Karamanian, Srinivas Tenneti, and Francois Dessart.  I will admit that Public Key Infrastructure (PKI) has been something of a double sided sword for me for some time.  I know that PKI is important for securing network resources, but I have also had the belief that certificate based security was a royal pain to implement.


This book took me through the basics of PKI in a manner that made a lot of concepts seem less complicated than I had made them out to be.  The step by step explanations of setting up PKI in a Cisco IOS world were well designed and presented.  Later on in the book the authors proceeded into more complex real world examples of VPNs and 802.1x scenarios based on the building blocks from the beginning of the book.  I am definitely going to keep this book on my quick reference shelf as I move forward with 802.1x and WPA2-Enterprise in my network.